학습 목표
1. @ControllerAdvice, @RestControllerAdvice 는 뭘까?
2. @ControllerAdivce 와 @RestControllerAdivce 에 차이점을 이해 하자
3. 사용자 정의 예외 클래스를 만들기
4. @ControllerAdvice 구현해 보기
5. 에러 페이지 코드 수정 (errorPage.jsp)
6. 직업 예외 발생해보기
1. @ControllerAdvice, @RestControllerAdvice 는 뭘까?
HTTP 통신을 통해 예외 상황을 클라이언트에게 알려주는 방법은 여러 가지가 있으며, 이들을 적절히 사용하는 것이 중요합니다.
@ControllerAdvice 와 @RestControllerAdvice 는 Spring Framework에서 제공하는 어노테이션들로, 애플리케이션 전역에 걸쳐 발생하는 예외를 효과적으로 관리하고 처리하는 데 사용됩니다. 이들은 일종의 "예외 처리의 중앙 집중화"를 가능하게 해주며, 애플리케이션 내 여러 컨트롤러나 서비스에서 공통적으로 발생할 수 있는 예외를 한 곳에서 관리할 수 있게 해줍니다.
2. @ControllerAdivce 와 @RestControllerAdivce 에 차이점을 이해 하자.
@ControllerAdvice와 @RestControllerAdvice 차이점
- @ControllerAdvice: 이 어노테이션은 주로 @Controller 또는 @RequestMapping 어노테이션이 적용된 클래스(즉, MVC 컨트롤러)에서 발생하는 예외를 처리하기 위해 사용됩니다. HTML 뷰를 반환하는 전통적인 웹 애플리케이션에서 주로 사용됩니다.
- @RestControllerAdvice: **@ControllerAdvice**와 유사한 기능을 제공하지만, **@RestController**에서 발생하는 예외를 처리하는 데 특화되어 있습니다. 즉, RESTful 웹 서비스에서 JSON이나 XML 같은 응답을 반환할 때 사용됩니다. 사실상, **@RestControllerAdvice**는 **@ControllerAdvice**에 **@ResponseBody**를 추가한 것과 동일한 효과를 제공하여, 응답 본문에 직접 데이터를 매핑할 수 있습니다.
예시 코드 확인 - 1
ControllerAdvice 에서 데이터를 반환하는 예시 코드
@ControllerAdvice
public class GlobalExceptionHandler {

    @ExceptionHandler(value = ResourceNotFoundException.class)
    @ResponseBody
    public ResponseEntity<Object> handleResourceNotFoundException(ResourceNotFoundException ex) {
        // 에러 메시지와 함께 404 상태 코드를 반환
        return new ResponseEntity<>(ex.getMessage(), HttpStatus.NOT_FOUND);
    }
}
예시 코드 확인 - 2
RestControllerAdvice 에서 반환
@RestControllerAdvice
public class GlobalExceptionHandler {

    @ExceptionHandler(value = ResourceNotFoundException.class)
		// @ResponseBody 사용 안해도 됨(데이터를 반환 처리 함)
    public ResponseEntity<Object> handleResourceNotFoundException(ResourceNotFoundException ex) {
        // 에러 메시지와 함께 404 상태 코드를 반환
        return new ResponseEntity<>(ex.getMessage(), HttpStatus.NOT_FOUND);
    }
}
3. 사용자 정의 예외 클래스를 만들기
RuntimeException은 프로그램의 실행 도중 발생하는 예외를 나타냅니다. 컴파일 시 예외가 아닌 실행 시 예외로 분류되며, 따로 try-catch 블록으로 처리하지 않아도 컴파일러가 오류로 인식하지 않습니다.
예시로는 NullPointerException, ArrayIndexOutOfBoundsException, IllegalArgumentException 등이 있습니다. 여기서는 RuntimeException 확장해서 사용자 정의 예외 클래스를 만들어 봅니다.
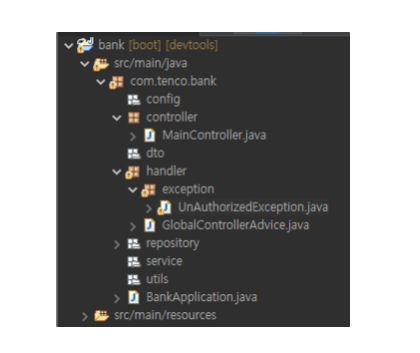
위 그림처럼 패키지와 자바 파일을 만들어 주세요 (handler/GlobalControllerAdivce.java 파일 생성)
- handler/GlobalControllerAdivce.java 파일 생성
- handler/exception 패키지 생성
- handler/exception/UnAuthorizedException 자바 파일 생성
: UnAuthorizedException 클래스는 인증이 안된 사용자가 인증이 필요하 서비스에 접근 요청을 할 때 예외를 발생 시킬 사용자 정의 예외 클래스를 설계 합니다.
package com.tenco.bank.handler.exception;

import org.springframework.http.HttpStatus;

import lombok.Getter;

@Getter
public class UnAuthorizedException extends RuntimeException  {

	private HttpStatus status;

	// throw new UnAuthorizedException(   ,  )
	public UnAuthorizedException(String message, HttpStatus status) {
		super(message);
		this.status = status;
	}

}
package com.tenco.bank.handler.exception;

import org.springframework.http.HttpStatus;

import lombok.Getter;

// 에러 발생시에 여러 페이지로 이동 시킬 때 사용 예정

@Getter
public class RedirectException extends RuntimeException {

	private HttpStatus status;

	// throw new RedirectException(???, ???);
	public RedirectException(String message, HttpStatus status) {
		super(message);
		this.status = status;
	}

}
package com.tenco.bank.handler.exception;
import org.springframework.http.HttpStatus;
import lombok.Getter;
@Getter
public class DataDeliveryException extends RuntimeException {
private HttpStatus status;
public DataDeliveryException(String message, HttpStatus status) {
super(message);
this.status = status;
}
}
4.@ControllerAdvice 구현해 보기
package com.tenco.bank.handler;

import org.springframework.web.bind.annotation.ControllerAdvice;
import org.springframework.web.bind.annotation.ExceptionHandler;
import org.springframework.web.bind.annotation.ResponseBody;
import org.springframework.web.servlet.ModelAndView;

import com.tenco.bank.handler.exception.DataDeliveryException;
import com.tenco.bank.handler.exception.RedirectException;
import com.tenco.bank.handler.exception.UnAuthorizedException;

@ControllerAdvice  // IoC 대상 (싱글톤 패턴) --> HTML 렌더링 예외에 많이 사용
public class GlobalControllerAdvice {

	/**
	 * (개발시에 많이 활용)
	 * 모든 예외 클래스를 알 수 없기 때문에 로깅으로 확인할 수 있도록 설정
	 * 로깅처리 - 동기적 방식(System.out.println), @slf4j (비동기 처리 됨)
	 */
	@ExceptionHandler(Exception.class)
	public void exception(Exception e) {
		System.out.println("----------------------");
		System.out.println(e.getClass().getName());
		System.out.println(e.getMessage());
		System.out.println("----------------------");
	}

	/**
	 * Data로 예외를 내려주는 방법
	 * @ResponseBody 활용
	 * 브라우저에서 자바스크립트 코드로 동작 하게 됨
	 */

	// 예외를 내릴 때 데이터를 내리고 싶다면 1. @RestControllerAdvice 를 사용하면 된다.
	// 단. @ControllerAdvice 사용하고 있다면 @ResponseBody 를 붙여서 사용하면 된다.
	@ResponseBody
	@ExceptionHandler(DataDeliveryException.class)
	public String dataDeleveryExcption(DataDeliveryException e) {
		StringBuffer sb = new StringBuffer();
		sb.append("<script>");
		sb.append("alert('"+ e.getMessage()  +"')");
		sb.append("window.history.back();");
		sb.append("</script>");
		return sb.toString();
	}

	@ResponseBody
	@ExceptionHandler(UnAuthorizedException.class)
	public String unAuthorizedException(UnAuthorizedException e) {
		StringBuffer sb = new StringBuffer();
		sb.append("<script>");
		sb.append("alert('"+ e.getMessage()  +"')");
		sb.append("window.history.back();");
		sb.append("</script>");
		return sb.toString();
	}

	/*
	 *  에러 페이지로 이동 처리
	 *  JSP로 이동시 데이터를 담아서 보내는 방법
	 *  ModelAndView, Model 사용 가능
	 *  throw new RedirectException('페이지 없는데???', 404);
	 */
	@ExceptionHandler(RedirectException.class)
	public ModelAndView redirectException(RedirectException e) {
		ModelAndView modelAndView = new ModelAndView("errorPage");
		modelAndView.addObject("statusCode", e.getStatus().value());
		modelAndView.addObject("message", e.getMessage());
		return  modelAndView; // 페이지 반환 + 데이터 내려줌
	}

}
5. 에러 페이지 생성 (errorPage.jsp)
<%@ page language="java" contentType="text/html; charset=UTF-8"
    pageEncoding="UTF-8"%>
<!DOCTYPE html>
<html>
<head>
<meta charset="UTF-8">
<title>${statusCode} Error - Page Not Found</title>
<link rel="stylesheet" href="https://cdn.jsdelivr.net/npm/bootstrap@4.6.2/dist/css/bootstrap.min.css">
<style type="text/css">
	body {
		display: flex;
		justify-content: center;
		align-items: center;
		height: 100vh;
	}

	.error--message {
		text-align: center;
		margin-bottom: 20px;
	}

</style>
</head>
<body>
	<div class="container">
		<div class="text-center">
			<h1>${statusCode}</h1>
			<p class="error--message"> Page Not Found </p>
			<p>${message}</p>
			<a href="/index" class="btn btn-primary">Go to Home Page</a>
		</div>
	</div>
</body>
</html>
'Spring boot' 카테고리의 다른 글
| # 12. MyBatis 설정 (DB 접근 기술이란?) (1) | 2024.08.07 |
|---|---|
| # 11. 어노테이션 정리 (0) | 2024.08.07 |
| # 9. MainController, mainPage.jsp 구현 (2) | 2024.08.06 |
| # 7. 화면 구현 - 1(템플릿 가져오기) (0) | 2024.08.06 |
| # 6. 모델링 (0) | 2024.08.06 |
